TeamHaven Mobile for iOS
This manual is also available in Français and in Português.
- See how TeamHaven Mobile works
- Install TeamHaven Mobile
- Login
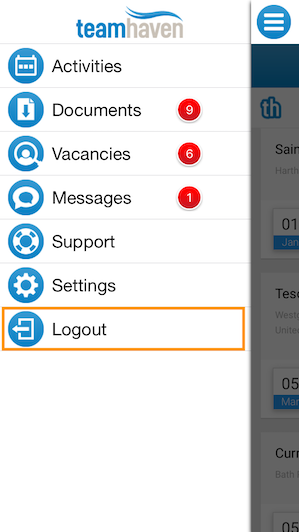
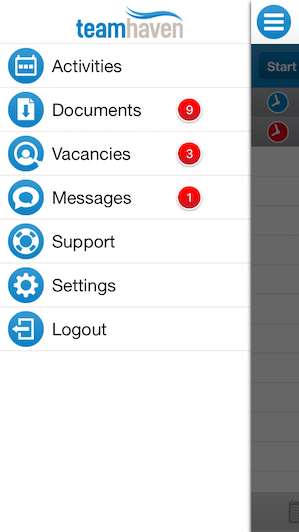
- Menu
- Activities
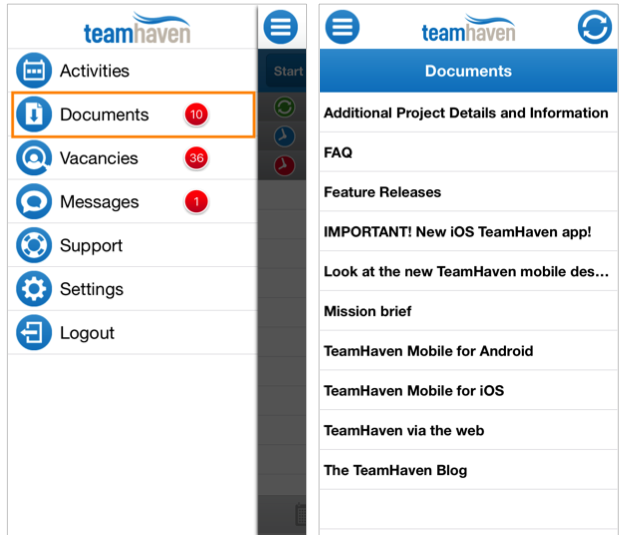
- Documents
- Vacancies
- Messages
- Support
- Settings
- Logout
Search "TeamHaven Mobile" in the App store on your device. Make sure the app’s publisher is “TeamHaven”.
Click “Download” and then “Install”. When the installation is complete, press “Open”.
IMPORTANT: Due to the nature of the jobs you will be doing, you must allow TeamHaven Mobile access to your location and camera whilst you are using the app. Please see ‘Permissions’ below to find out how to manually turn these features on.
For more information on how this information is used please read TeamHaven’s Privacy Policy.
In order to receive bug fixes and new features, it is important you keep the app up-to-date and have the latest versions installed.
To do this, go to the ‘iTunes & App Store’ submenu in your device’s settings and enable automatic updates for ‘Apps’. Please note, this will also cause any other apps you have to also automatically update.
In order for TeamHaven Mobile to function, it needs access to your location whilst you are using the app and camera. You would have been able to give the app permission to access this when you opened the app for the first time or you can turn it on via your device’s Settings. Go to your device’s “Settings” and scroll down the page until you find “TeamHavenMobile”.
Press “Location” and select “When Using the App”. This is so TeamHaven can pick up your location if you are required to check-in and out of activities.
Ensure you also have the function “Camera” enabled. This allows you to take photos using the TeamHaven Mobile app.
Find the applications section on your device and look for the TeamHaven Mobile icon.
If you are unable to find it, make sure you have TeamHaven Mobile installed on your device.
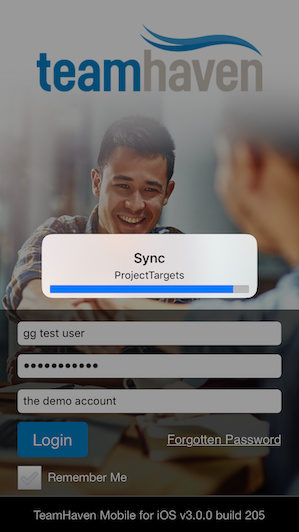
Enter your username, password and account name, then press “Login”. Please note, your password is case sensitive!
Tick “Remember Me” if you want TeamHaven to save your details.
If you can’t remember your password, please read the Forgotten Password section below.
Please note: You would have received your username and account name in a welcome email. Please contact your Line Manager if you did not receive this email.

After pressing “Login”, the app will connect with the TeamHaven server- this is called ‘synchronising’.
The synchronisation process will take a couple of minutes. Once it has synced, you will open up on the Activities page.
After logging in for the first time, you can log into TeamHaven using fingerprint or facial recognition. Check your device’s security settings to see if this feature is available.
To reset your password, press “Forgotten Password?” on the login screen.
You will be re-directed to the below webpage. Enter the email address associated with your TeamHaven account. You will then receive an email with instructions on how to reset your password.
Please note: This function will only work if your Line Manager allows you to reset your own password and if you have a working email address stored in TeamHaven. Please contact your Line Manager for more information.

Your new password must meet the following criteria:
- Minimum of 8 characters
- No username or account name combinations
- No “password”, “TeamHaven” or “test” type phrases
Once logged in, you will automatically be taken to the ‘Activities’ screen- this is where you see, plan and start activities.
To access the Menu, press the icon in the top left-hand corner of the screen.
Use the menu to navigate to:

Notification will appear in red circles in the menu. These highlights the number of Documents, Messages and Vacancies you currently have.
This section explains how to view, plan, start, and complete activities.
STEP 1: Find and plan activities
STEP 2: Get directions to and start activities
- Additional function: Start day
- Get directions to activities
- Start activities
- Additional function: Check-in/ Check-out
STEP 3: Complete activities
STEP 4: Upload activities
STEP 5: End day
- Additional function: End day
Other additional functions:
Terminology: Unplanned activity- the activity must be completed between its earliest and latest date. Click here to find out how to plan an unplanned activity.
Planned activity- the activity is booked for completion on a set day. You can change the planned day if you wish, so long as it is before the activity’s latest date.
Before looking at your activity, press the synchronisation button in the top left-hand corner to ensure you have the latest information on your device.
See activities in a diary, map or list view by pressing the different icons at the bottom of the Activities screen.

Activity Icons:
Depending on whether you are looking at your activities in a diary, map or list view, you will see the following icons:
 Start Day- Your Line Manager may require you to use Start Day before traveling to your first activity. Contact your Line Manager to confirm this with them.
 Sort- Sort or group activities by location, planned start, the earliest and latest date for completion, as well as other factors in the project. Find out more here.
 Search- Search for activities by location or project name.
 Create new activity- Use this to create a new activity. Your Line Manager will need to give you permission to use this function.
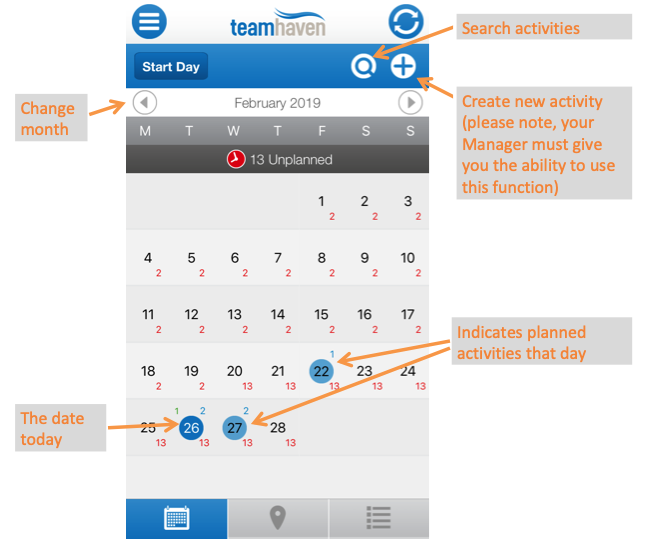
To see activities in a calendar, press the calendar icon at the bottom of the ‘Activities’ screen.
This shows you a month overview of your activity. Click on each day to get more information about the activities on each day.
On diary view, you can search and create new activities. Please note, your Line Manager will need to give you permission to create new activities.
To sort activities, please use the ‘list’ view.
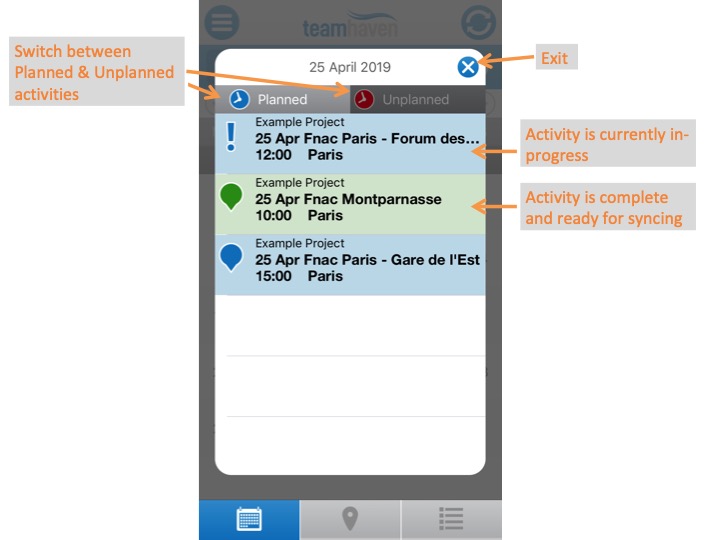
Diary day view - Press a day in your diary view to see the activity on that date.
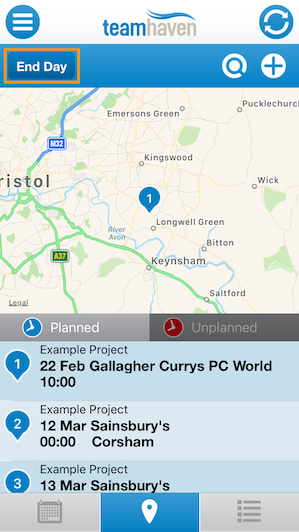
See today’s activities on a map by pressing the pin icon at the bottom of the ‘Activities’ screen.
Use the map or Planned and Unplanned lists to see your activities. Double tap on an activity in the list to see where it is on the map.
You can also search for activities and create new activities. Please note, your Line Manager will need to give you permission to create new activities. Use the list view to sort activities.
![]()
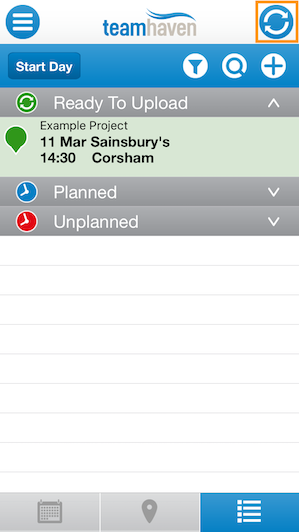
Press the ‘list’ icon at the bottom of the ‘Activities’ screen to see activities in a list format.
Use the drop-down options to see planned, unplanned and activities that are ready to sync. Press on an activity within the list to see it in more detail.
Use icons at the top of the screen to sort, search and create a new activity. Please note, your Line Manager will need to give you permission to create new activities.
![]()
Use the search tool on the Activities page or the sort tool on the List View to find and display activities.
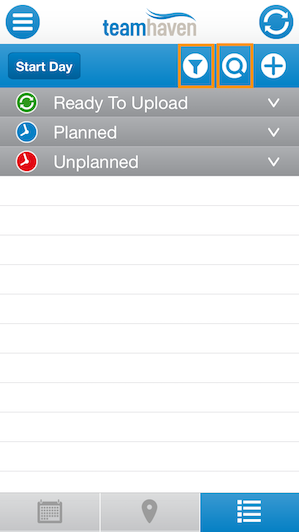
Search: Use the search icon on diary, map and list view to search for an activity. Use this to search for activities by their location.
Sort: Use the sort icon on the list view to sort and group activities so they are easier to view and find.
Sort by: Use “Sort” to sort activities by location, planned start date (if it has one), earliest start date and latest start date.
Group by: Use “Group By” to sort activities by date or group. Your Line Manager will determine the ‘groups’ you can sort by.
Schedule your unplanned calls and plan when you are going to complete them.
Not only does this let your Line Manager know when the activity will be completed, but it also helps you organise your workload.
Select an unplanned activity from either the diary, map or list view.
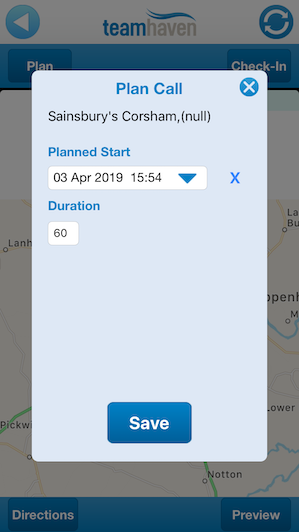
Press “Plan” in the top left-hand corner of the activities screen to plan when you would like to complete your job.
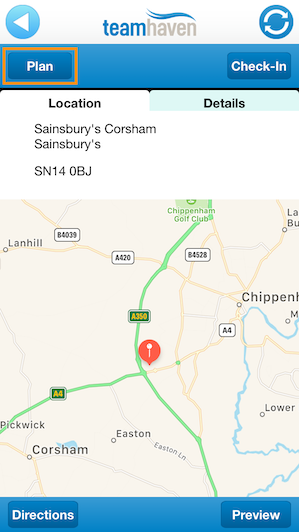
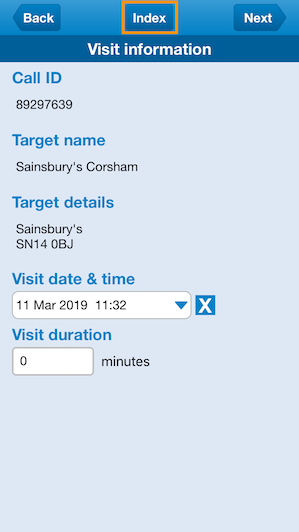
Press the drop-down arrow next to “Planned Start” to schedule the activity. Use the “Duration” field to estimate (in minutes) how long the activity will take to complete.
Please note: Check the date is scheduled for a date and time in the future and that the duration is in minutes. Otherwise, your activity will not be planned.
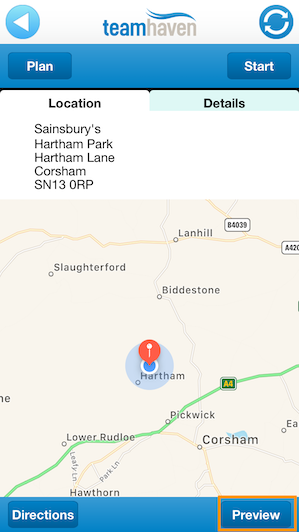
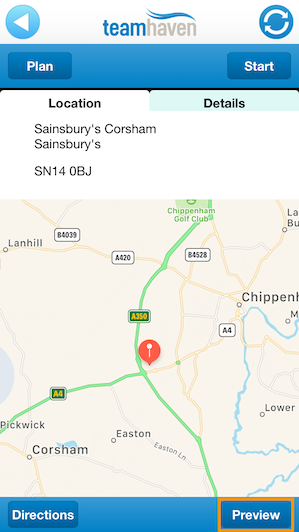
Before starting an activity you can ‘preview’ it and see the questions and forms it includes.
To do this, go to the activity and press “Preview” in the bottom-right corner.
Once you have saved and completed the activity, you can check your answers by clicking “Review”.
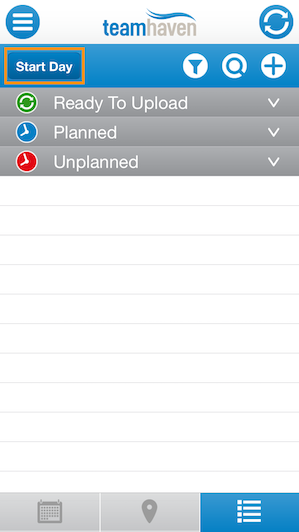
Your Line Manager may require you to notify the app before you leave to travel to your first activity of the day and to let it know when you have finished your last activity that day.
Press “Start Day” on the diary diary, map or list view.
IMPORTANT: Remember to press “Start Day” before you travel to your first activity. Remember to press “End Day” after you have finished your last activity for the day.
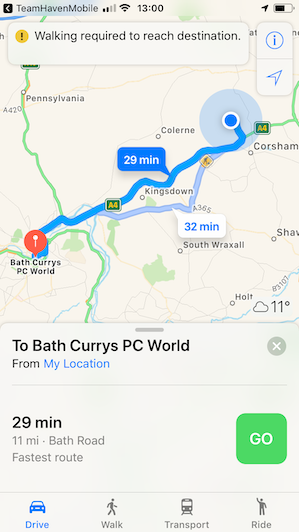
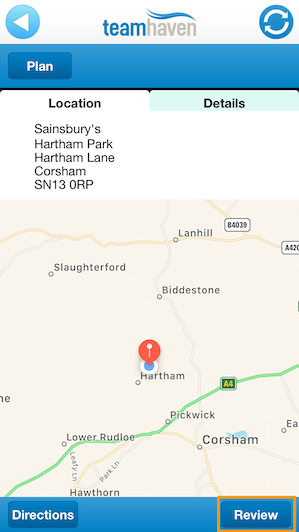
To get directions to your activity, go to the activity and press “Directions” in the bottom left-hand corner. A new screen will then appear.
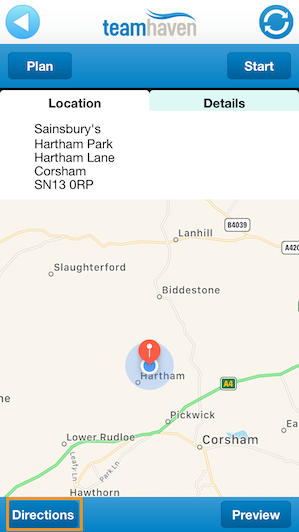
Select whether you want to drive, walk or use public transport. Press “GO” to start the directions.
Press “End” to stop the directions.
Re-open the TeamHaven Mobile app to start your activity.
Instead of having “Start”, you may have a button saying “CheckIn”.
This is because your Line Manager wants to make sure you are at the location and on time.
Before starting your activity, press “CheckIn” on the top right-hand corner of the activity’s screen.
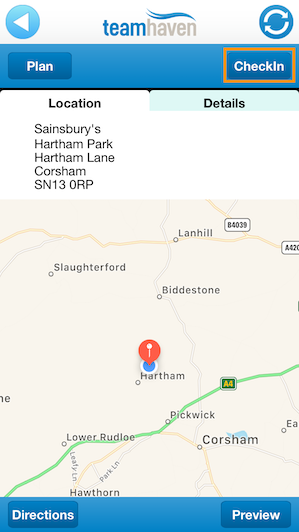
After pressing CheckIn, a screen will appear with the following information:
Accuracy- This indicates how accurately your device has determined your location. Buildings, trees and even clouds can affect this. Most devices use a combination of GPS, Wi-Fi and cell phone towers to determine your location. This will be displayed as either “GOOD” or “BAD”. Distance- This displays the estimated distance in metres between where you are and the location you are visiting.
Press “Ok”.
Depending on how far away you are from the location of your activity, may not be able to start your job. Make sure you are in the correct location before contacting your Line Manager for help.
If you receive an error message, click here to find out why.
IMPORTANT: Please remember to “Check-out” as soon as you complete your job. You must check-out before you leave the location of your activity. Otherwise, you will not be able to synchronise your activity and will have to return to that location.
GPS (signal from satellite) - Sometimes the signal may drop. Wait for the link with the satellite to re-establish again. Satellite signal can be interrupted by a number of things: bad weather, being in a location with a metal structure - which blocks the signal, indoors of large malls, etc.
Phone Signal (3G / 4G) - The number of masts visible to the phone are factors in how accurately the phone’s location is defined. For example, if the device is only visible to 2 masts then the location will be less accurate than if it was visible to 3. If the mobile network is unable to pick up 3 or more masts the quality will drop and will provide approximate locations.
**Wifi- **This will give the location of the internet hub, not the phone. This could explain why you appear to be further away from the location than you actually are.
When checking in or out you may encounter an error message. Most of the time these are easy to fix. Please see below to find out more about the error message you’ve received:
Unable to check in call- messages: You are unable to check in as you have exceeded the maximum distance allowance between your device and the target. Please move closer to the location of your visit and try again. If this is not successful, contact your Line Manager for assistance.
The server rejected your attempt to check into this call. The most common reason for this is that you are no longer assigned to the activity. Please contact your Line Manager for assistance.
Your device position accuracy is BAD (approximate). The settings on the project will not allow you to check in with an 'BAD' position. Move towards a window or move away from high-rise buildings in order to improve your location accuracy. AND Make sure your ‘Location Service’ for TeamHaven Mobile is activated. Turn this on by going to your device’s settings and scroll down your apps until you see “TeamHavenMobile”. Go to “Location” and select “While Using”. This will allow the app to capture your location and enable check in/out only whilst you are using the app. If this is not successful, contact your Line Manager for assistance.
Your device position accuracy is FAILED (unknown). The settings on the project will not allow you to check in with a 'FAILED' position. Move towards a window or move away from high-rise buildings in order to improve your location accuracy. AND Make sure your ‘Location Service’ for TeamHaven Mobile is activated. Turn this on by going to your device’s settings and scroll down your apps until you see “TeamHavenMobile”. Go to “Location” and select “While Using”. This will allow the app to capture your location and enable check in/out only whilst you are using the app. If this is not successful, contact your Line Manager for assistance.
You are unable to check in because the device 'Location Service's facility is disabled. You need to switch your devices ‘Location Service’ facility on and at a high accuracy. Turn this on by going to your device’s settings and scroll down your apps until you see ‘TeamHavenMobile’. Go to ‘Location’ and select ‘While Using’. This will allow the app to capture your location and enable check in/out only whilst you are using the app.
Unable to check out call- message: The server rejected your attempt to check out of this call. The most common reason for this is that you are no longer assigned to the activity. Contact your Line Manager for assistance.
You need to check out call - dateTime : Call ID - callid You can't check into this activity because you are still checked in to another activity. Find the activity with the call ID shown and press “Check out”. The activity’s check out button will be in the same place as where you found the check in button.
Other error messages There are certain errors that you will not able to rectify due to these being restrictions set by your Line Manager. In these cases, please contact your manager for further assistance.
You must ‘Check Out’ before you leave the location of your activity. Check in and out is an additional step your Line Manager may require you to do. If you are required to check-in/ out, instead of a “Save” button you will have a “CheckIn” button. After you have completed your activity, press “Check Out”. You will not be able to synchronise if you are still checked in to and activity.
After checking out, a screen will appear letting you know how far away you are from the activity’s location. Press “OK”.
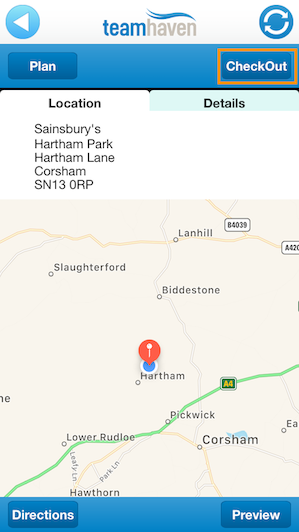
If you receive an error message, click here to find out why.
Press “Start” to begin the activity.

This section shows you how to review and fill out questionnaires.
This screen displays an index of all the forms contained in an activity's questionnaire. Forms are used to separate out questionnaires. Click here [hyperlink to form types] for more information on the different form types.
Press “Preview” on the activity screen to see the questions and forms before starting the job.
If you have already started the activity, press “Index” in the questionnaire to see a list of the forms.
Press the form names to see the questions it contains.
Once in the questionnaire, navigate between forms using the arrows at the top.
Form and questionnaire icons These icons indicate issues within forms:

There is a format error with one of your answers in that form. This icon will appear next to the question that has the issue.

This icon will display if there is a mandatory question that has been left unanswered. You cannot save the questionnaire unless all mandatory questions have been answered. These questions will display in orange within the questionnaire.
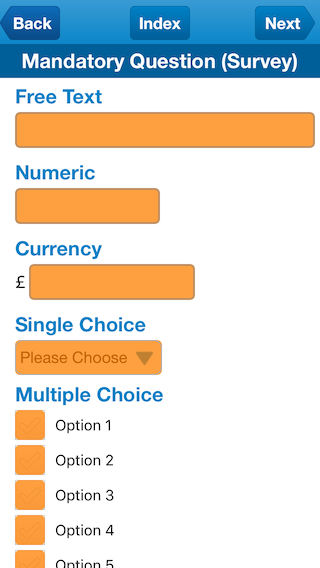
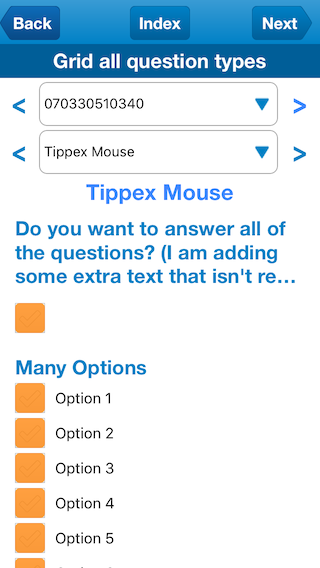
Survey Forms Survey forms will display a list of questions on one page.
Grid forms Grid forms are questions that are answered against specific items. Depending on the type of job you do, items can be specific products, promotions, displays or any other element.
Normal grid forms Questions display against items on one page.
Paged grid forms Items within a grid form can be grouped into categories- this makes viewing the questions easier.
If an item list is grouped, you will see the questions for each item individually. To move between groups and items you need to use the drop-down boxes and select the appropriate group or item from the list.
Alternatively, you can move between these by using the arrows on either side of the dropdown box.
You may come across different types of questions when completing the questionnaire. See below for a brief description of each question type.
TIP: If you have multiple text or numeric questions, press enter on the keyboard to move to the next question.
Please note: All mandatory questions will display in orange. These must all be answered before you can save your activity.
Free text There is no limit on the type of data you can enter, although there is a character limit. The keyboard on your device will open when you select the free text field.
Numeric Numeric fields can only contain numbers and decimal points. If you enter data that does not follow this format you will see a format error icon.
Please Note: Some numeric questions may have rules, for example “Only allowed 0 decimal places” – if you do not follow these rules the format error icon will display.
Single Choice Single choice questions allow you to select one answer from a list. Open the list by pressing the drop-down box, and then select the answer.
Multiple Choice Select one or more answers from a given list. Press the tick box once to select an option. Press it again to unselect it.
Date and Time Press the drop-down box to open the date or time selector. Press “Select” to enter your answer.
Yes-No Press the tick box to answer 'Yes' and the cross for 'No'.
Picture You can answer picture questions either by taking a new photo, or by using one you have already taken. Tap the camera icon to take a new photo using your camera. To use an image already on your device, hold your finger on the camera icon until your photo gallery appears. Once you have taken a photo or selected one from within your photo gallery, a preview of the photo will appear within the questionnaire. Press “X” to remove the image.
Please note: Your Line Manager has the ability to stop you using photos in your photo gallery.
Signature Press the pen icon to capture a signature. This opens a signature capture page. Select “Cancel” to close the signature. Pressing “Clear” will remove your current signature. “Save” will place your current signature into the questionnaire.
Scan Barcode Tap the Scan Barcode button at the top of the form and point the camera at a barcode. The barcode will only scan registered barcode numbers. Tap X to exit the barcode. The form will show the last barcode that was scanned.
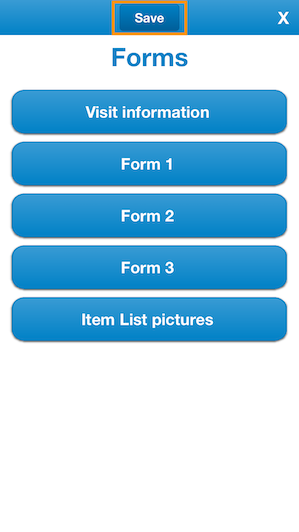
You have to save your questionnaire before being able to close and synchronise activities.
To save the questionnaire, press “Index” whilst within the questionnaire and press “Save”. This is located at the top of the ‘Form’ (“Index”) page.
Once an activity has been completed and saved, it will show as green.
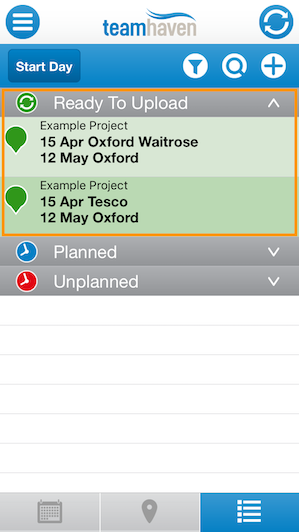
Completed calls will appear under the planned tab on the calendar and map view, and under the ‘Ready to Sync’ tab on the list view.
You can ‘review’ answers to saved questionnaires before syncing and in some cases, your Line Manager might also allow you to edit your answers.
Find the completed activity you wish to review/ edit. Completed activities will appear in green and under the section ‘Ready to Sync’ on the list view.
To review your answers, press “Review” in the bottom left-hand corner of the activity’s page.
Your edited answers will automatically save whilst you make changes.
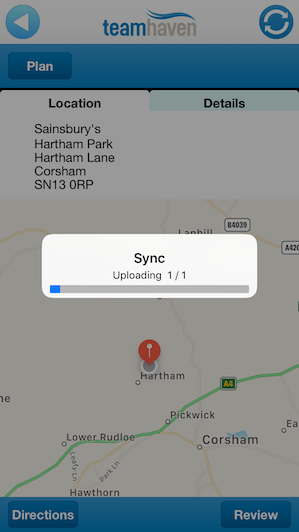
You must syncronise your activity during the day, preferably after you have completed each activity.
Synchronisation is where the app communicates with TeamHaven to find new activities that have been assigned to you and send completed activities to your Line Manager.
Once you are happy with the answers to your questionnaire, synchronise by pressing the circle button in the top-right hand corner of the app.
When the app synchronises, all the activities in the “Ready to Upload” tab on List view will disappear and the data will be sent to TeamHaven.
Please note: You will not be able to edit questionnaires after you have synchronised and they will disappear from the app.
If your Line Manager requires you to use the ‘Start Day’ function, you must remember to press “End Day” after you have returned from completing your last activity of the day.
You will find “End Day” on the diary, map or list view.
It is important you press “End Day” only after you have traveled back from your last job. This is so the app can accurately calculate your mileage that day.
Ask your Line Manager if you are required to use Start and End day.
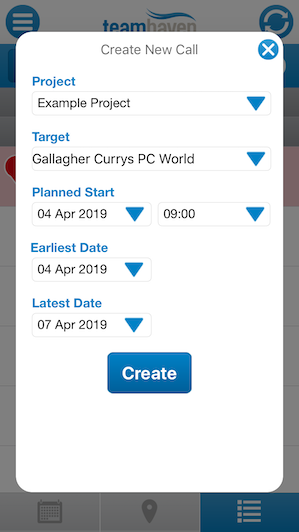
Your Line Manager may allow you to create a new activity via the TeamHaven Mobile App.
To create a new activity, press the plus icon on the diary, map and list view.
![]()
Enter the project and location you want to create the activity for, as well as when you plan on completing the activity.
Then press “Create”.
You must have a connection in order to successfully create an activity.
“Documents” is where you will find PDF files from your Line Manager, as well as help guides.
Your Line Manager may use ‘documents’ to provide you with additional information about your activity such as training materials, detailed instructions and planograms.
To access your documents, click on the menu icon and select “Documents”.
Your Line Manager will use ‘Vacancies’ to send you jobs that you can choose to either reserve or decline.
Select “Vacancies” to see the projects and activities that still need to be reserved.
Select the project you want to see the vacancies for. Reserve jobs by pressing the tick next to the activity, or reject it by pressing the cross.
Once you have reserved the job, your Line Manager will confirm that the job is yours. When your manager has confirmed you have got the job, the next time you synchronise the activity will appear on the app as a planned activity.

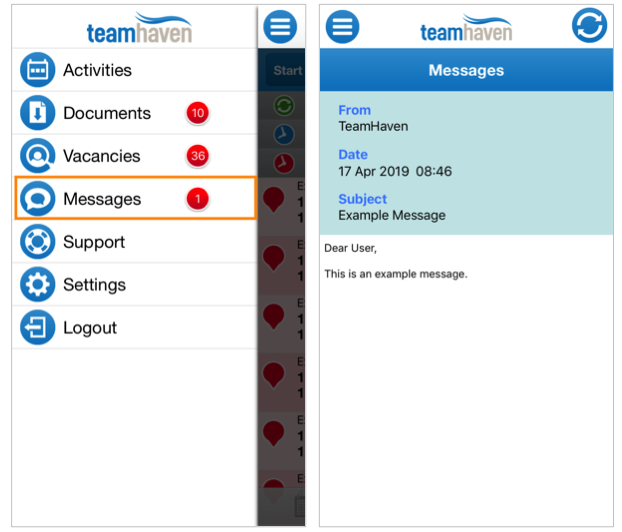
Your Line Manager may send you direct messages through the app. A notification will appear on the menu when you have a new message.
To see your messages, click on “Messages” from the menu.
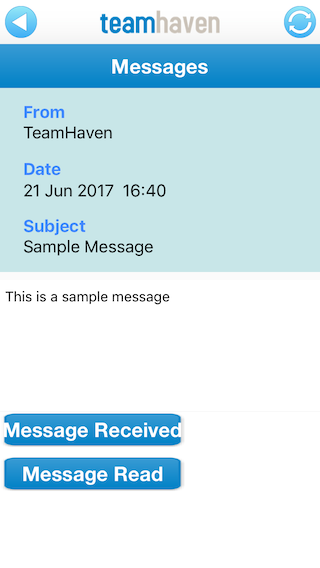
New messages will display in bold. Tap on the message to open it.
Some messages will require you to give a pre-determined response. Click one of the options at the bottom of the message.
TeamHaven is responsible for supplying the software you use as part of your job. Therefore, we are unable to answer any specific queries about products, promotions, as well as any steps you need follow in order to adhere to KPIs. Please contact your Line Manager regarding these questions.
If you are experiencing an issue, please:
- Check you are connected to the internet
- Follow the instructions on the error message (if any appear)
- Check login details (if you are having an issue logging in)
If that does not help, please attempt these troubleshooting steps:
• Close all open apps • Turn off the device, wait 5 minutes and switch the device back on • Connect to wifi • Log back in to the TeamHaven Mobile app with the correct details • If you are unsure if your password is correct, use the ‘Forgotten Password’ function to reset it. • Press the sync icon
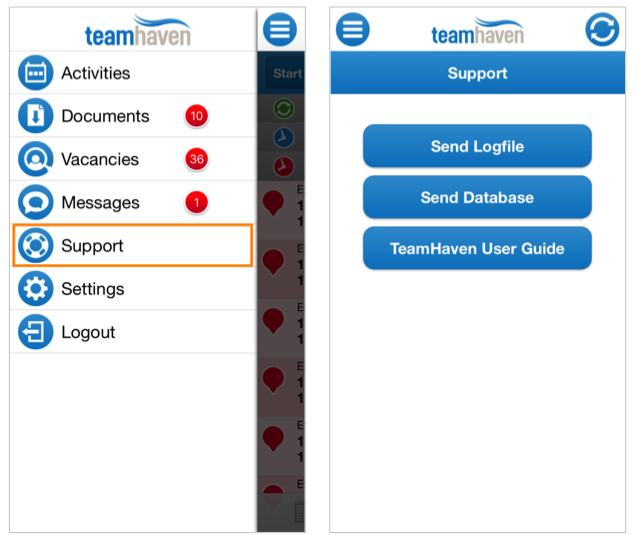
If you are still experiencing a problem, please contact support@teamhaven.com or call us on +44 (0) 1249 470420. We will need the following information:
• Username • Make and model of the device you’re using e.g. iphone 6s • App build number and version code- this can be found on the app’s login page at the bottom of the screen • Explanation of the issue you have experienced • Was there an error message and when does it appear? • If you are using wifi or 3G/4G
Please Note: If you are looking for this support guide in the app, go to “Documents”. You will also see user guides on how to use the app for Android, iOS and the web.
This is where you can change the TeamHaven Mobile app’s settings.
Language – Change the language displayed in the TeamHaven Mobile app.
Server- Please do not change this setting unless advised to by TeamHaven.
To log out of the app, select “Logout” from the menu.
Confirm that you wish to log out by selecting “Logout”.